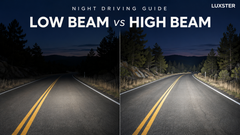
You switch on your high beams, yet the lane markings are still hard to pick out. The next step is to consider the conditions and where the headlights are sending their light. A different beam setting, a clearer windshield, or corrected headlamp aim may matter more than extra brightness. Here is how to choose your beams and check the basics before replacing bulbs.
Choose Your Beams for the Road Ahead
Use these four situations as cues to adjust your lights while you drive.
Lit city streets
Select low beams. Confirm full nighttime lighting is on; parking lights alone are insufficient for nighttime driving.
Dark road, no other vehicles
Select high beams while conditions remain clear. Scan for approaching headlights and vehicles ahead, and be ready to dim.
Oncoming traffic or a car ahead
Return to low beams. Anticipate traffic at crests and bends rather than waiting for another driver to flash their lights.
Rain, fog, or heavy spray
Select low beams, reduce speed, and increase following distance. Use the wipers and defroster to maintain a clear windshield.

For one state-specific example, Pennsylvania's driver's manual requires low beams within 500 feet of an oncoming vehicle and within 300 feet when following. Those figures describe Pennsylvania's rule; check the DMV guidance for the state where you drive.
What Changes When You Switch Beams?
The headlamp controls where the light goes. Low beams direct useful light toward the road while limiting upward light toward other drivers. High beams put more light farther ahead and higher in the scene, where it can also create glare for traffic.
That change may come from separate bulbs, different filaments, a projector shutter, or an integrated lighting system. It is not necessarily a simple increase in the same bulb's brightness.
| Feature | Low beams | High beams |
|---|---|---|
| Light distribution | Controlled road illumination with reduced upward light | More light directed farther forward and higher |
| Best setting | Traffic, lit roads, poor weather | Clear, dark roads without traffic to dazzle |
| Glare control | Designed to limit glare when correctly aimed | Requires timely dimming around others |
Know the dashboard clues. The common high-beam symbol is a blue headlamp with straight rays. A low-beam symbol, where fitted, typically has downward-slanting rays and is often green. Some vehicles instead show a general lights-on indicator. Consult your exact manual; the 2024 Kia Sportage U.S. manual illustrates several separate lighting indicators.
AUTO does not automatically mean automatic high beams. AUTO usually controls when the exterior lights turn on as ambient light changes. Automatic high-beam assistance is a separate feature that may need to be enabled. Its readiness indicator does not necessarily mean the high beams are currently on. Check your manual and override the system whenever conditions require it.
When More Light Does Not Mean Better Visibility
Fog scatters light from your headlights back toward your eyes, while wet pavement and spray can add distracting reflections. The result can be a brighter-looking scene with less useful detail. California DMV's safe-driving guidance explains how high beams can reflect back in fog and create glare.

A bright patch just in front of the bumper also does not prove that a headlight lights the road well. Aim, beam shape, lens condition, and the match between the light source and housing all matter. IIHS evaluates headlights for visibility on straight roads and curves, as well as glare toward oncoming drivers.
If your low beams seem inadequate, check these first
- Clean the view: remove dirt from the headlamp lenses and both sides of the windshield; use the wipers and defroster as needed.
- Inspect the lamps: check for a failed bulb, cloudy lenses, damage, or persistent moisture that needs attention.
- Check installation and aim: a poorly seated bulb or misaligned housing can put light in the wrong place. Follow the vehicle's procedure or have a qualified technician inspect it.
- Review recent changes: if visibility worsened after a bulb or headlamp swap, verify compatibility and the resulting beam pattern before buying a brighter replacement.
Hypothetical example: After a bulb change, your low beams seem patchy. Once safely parked, start with clean lenses and glass, then inspect both lamps. If nothing obvious explains the problem, verify bulb seating and have the aim checked. Finally, confirm that the replacement source matches the housing. This order helps you investigate the change before choosing another bulb.
If you cannot stop within the road you can see, reduce speed. When conditions make driving unsafe, leave the roadway and stop in a safe location.
Check These Details Before Replacing Your Bulbs
Build a fitment record before shopping. Two vehicles with the same model badge can have different headlamp systems.
- Vehicle: year, make, model, and trim or lighting package.
- Factory headlamp type: halogen, HID/xenon, or integrated LED; record any aftermarket housing changes.
- Original bulb identification: check the owner's manual and the markings on the existing bulb, rather than relying on appearance.
- Position and architecture: confirm low beam, high beam, or a combined dual-beam arrangement. A single-beam bulb can serve different positions in different vehicles.
- Installation needs: verify connectors, retaining hardware, dust-cap clearance, and any vehicle-specific electrical requirements. Integrated LEDs may require module or assembly service.
A bulb number describes a source type, not a universal assignment to high or low beam. Confirm the actual headlamp configuration before ordering. Physical fit alone also does not establish suitability for public-road use; follow the vehicle and headlamp manufacturers' requirements and applicable lighting rules.
With those details ready, explore Luxster's bulb selection and review the fitment notes for your exact application. Treat a vehicle selector as a starting point, especially if the original headlights have been changed.
Quick Questions Before Your Next Drive
Can I use high beams if a low-beam bulb fails?
Do not use them as a workaround around traffic. Repair the failure before nighttime travel; a functioning high beam does not restore the low-beam pattern.
What if an approaching driver will not dim?
Avoid staring into the lamps. Look toward the right edge of your lane, slow as needed, and maintain your lane. Do not retaliate with your own high beams.
Do daytime running lights count as headlights at night?
No. DRLs may leave the taillights off and are not a substitute for the vehicle's nighttime lighting. Confirm the full lighting system is on.
Can fog lights replace low beams?
No. Use fog lights only as a supplement permitted by your manual and local rules. They do not replace the road illumination supplied by headlights.
Should I test the new bulbs before my next trip?
Yes. While safely parked, check both beam settings, exterior lamps, and dashboard warnings. Have aim and beam pattern checked after installation; a successful power-on is only the first check.